Migrating to Nikola

I've written my last posting on this blog more than 5 years ago. When I recently wanted to share some details of my backup system with you, I noticed that tinkerer, the blog compiler I've been using previously did not receive any updates since 2017 and won't run flawlessly on my system any more. So, once again I had to migrate the old blog posts to a new system: Nikola. This time however, the migration was easier than the previous time as tinkerer's blog posts are stored as reStructuredText - a format supported by Nikola as well. All I had to do was to create a small script that creates *.rst files containing the appropriate headers for Nikola, especially the title, slug and date:

#!/bin/bash
FILE=$1
if [[ ! $FILE =~ 2[0-9][0-9][0-9]/[0-9][0-9]/[0-9][0-9] ]]; then
        echo "file path must include the date!"
        exit 1;
fi
DATE=$(egrep -o "2[0-9][0-9][0-9]/[0-9][0-9]/[0-9][0-9]" <<< "$FILE")
YY=$(cut -d '/' -f 1 <<< "$DATE")
MM=$(cut -d '/' -f 2 <<< "$DATE")
DD=$(cut -d '/' -f 3 <<< "$DATE")


TITLE=$(head -1 "$1")
SLUG=$(tr '[:upper:]' '[:lower:]' <<< "$TITLE" | sed 's#[^0-9a-z]#_#g')
CATEGORIES=$(grep ".. categories::" "$1" |  cut -d ":" -f 3-)
TAGS=$(grep ".. tags::" "$1" |  cut -d ":" -f 3-)
LINES=$(wc -l "$1"  | awk '{print $1}')
LINES=$((LINES-2))

echo ".. title: $TITLE"
echo ".. slug: $SLUG"
echo ".. date: $YY-$MM-$DD 12:00:00 UTC+02:00"
echo ".. tags: $TAGS"
echo ".. category: $CATEGORIES"
echo ".. link: "
echo ".. description: "
echo ".. type: text"


tail -n "$LINES" "$FILE" | egrep -v "\.\. author::|\.\. categories::|\.\. tags::|\.\. comments::|\.\ highlight:: none" | sed 's#.. [h|H]ighlight::#.. code-block::#g'

Because tinkerer stored the date of the blog posting via the directory structure, the script needs this information as well:

find . -name "*rst" | grep ./2 | while read l; do ./script.sh "$l" > "~/blog/posts/$(basename "$l")"; done

Unfortunately, back in 2013/2014, I did some strange things in the original *.rst files, so I had to fix several files manually. Nevertheless, the script shown above saved me lots of work.

Backup

When being asked about my hobbies, photography is usually among the top three of my answers. However, besides being a quite expensive spare time activity, it is accompanied by an ever-increasing amount of digital images (currently around 280GB). Storing these images in a secure manner is an important matter, because no one wants to lose these digital treasures, especially since they are often connected with precious memories.

Although my setup may not be safe against catastrophes such as fires or nuclear blasts, I claim that I am safe against most remaining data loss scenarios. After taking pictures with my SLT A58 the first step is to copy the data to my workstation. Once this is finished, all files are renamed based on the recording timestamp via Exiftool

exiftool '-filename<CreateDate' -d %Y%m%d_%H%M%S%%-c.%%e -r .

This is necessary because the default file names produced by my camera are neither descriptive nor unique (the image counter wraps around at 10000). After this is finished, the real work begins as I want my files to be properly sorted in folders describing the occasion the pictures were taken. While this is a very basic approach for file management, it actually fits my needs fairly well as it does not depend on any kind of further software for metadata management. Additionally, tagging the photos, e.g. with digiKam, is still possible.

The storage device that holds the first copy of the files is my HP Microserver running FreeNAS. The system is configured in a way, that all data written to the ZFS pool is mirrored between the two enterprise grade hard disks, similar to a RAID-1. Snapshots of the photo dataset are taken automatically every day. However, mirroring and snapshots are fine, but another level of redundancy is still needed. That is why I sync my ZFS datasets to the workstation via zrep.

The intial setup requires some commands to be executed on the workstation (WS) and on the NAS:

zfs create nasbackup/photos # WS: create the dataset 'photos' in the pool 'nasbackup'
zrep changeconfig -f -d nasbackup/photos <NAS-IP> pool1/photos # WS: set the backup properties
zfs set zrep:savecount=2000 nasbackup/photos # WS: set the number of snapshots to keep
zrep changeconfig -f pool1/photos <WORKSTATION-IP> nasbackup/photos # NAS: set the backup properties
zfs set zrep:savecount=2000 pool1/photos # NAS: set the number of snapshots to keep
zfs snap pool1/photos@zrep_000001 # NAS: create the initial snapshot
ssh <NAS-IP> zfs send pool1/photos@zrep_000001 | pv | zfs recv -F nasbackup/photos # WS: sync the initial snapshot to the local disk
zrep sentsync pool1/photos@zrep_000001 # NAS: announce that the initial sync was successful once it's completed
zfs rollback nasbackup/photos@zrep_000001 # WS: rollback the dataset to the snapshot
zfs set readonly=on nasbackup/photos # WS: set the dataset so read-only

After these initial steps, all further backups boil down to one simple command:

zrep refresh nasbackup/photos

This creates a fresh snapshot on the NAS and syncs all new snapshots (i.e. also the ones created automatically by FreeNAS) to the local dataset. In order to get a progress indicator for zrep, I've set the ZREP_INFILTER variable to pv.

As I have multiple datasets on my systems, I wrapped the zrep command in a small Bash script nasbackup:

#!/bin/bash
NASIP=192...
SYNCFOLDERS=(photos video mobile ...)

if ! ping -c1 "$NASIP"; then
        echo "NAS not available"
        exit 1
fi

if [[ $# -gt 0 ]]; then
        for arg; do
                if ! grep -q "$arg" <<< "${SYNCFOLDERS[@]}"; then
                        echo "$arg is not a valid dataset!"
                        continue
                fi
                echo "===== Backing up nasbackup/$arg ====="
                time zrep refresh "nasbackup/$arg"
                echo "===== END ====="
        done
else
        for arg in "${SYNCFOLDERS[@]}"; do
                echo "===== Backing up nasbackup/$arg ====="
                time zrep refresh "nasbackup/$arg"
                echo "===== END ====="
        done
fi

I could easily create a cron job for the backup script, but as I've explained, the process of adding new images always involves manual work - so I run the script manually.

A list of snapshots for a specific dataset can be obtained via:

zfs list -r -t snapshot -o name,creation,used,refer nasbackup/photos

Any snapshot from this list can be mounted with the standard mount command, e.g. mount -t zfs nasbackup/photos@zrep_000001 /mnt/backup would mount the initial snapshot created above to /mnt/backup. This is especially helpful if you would like to restore specific files from a snapshot. For this task, it is sometimes quite handy to know what changed between two snapshots - a simple zfs diff <snapshot1> <snapshot2> gives the answer. After all, I always hope I won't need the backup, but every time I run the backup script I'm pleased to see how smooth and fast it works.

Who Is Phoning Home

The current development in consumer electronics like tablets or mobile phones couldn't be worse. At least if you care a little bit about privacy. A few years ago, Spy- and Adware that came bundled with other software was unwelcome to (almost) every Windows user. Internet Discussion Boards were overrun by people trying to get rid of annoying web browser bars that were installed together with their favorite file sharing tool. Others even refused to use the Opera web browser because it was ad-sponsored.

Nowadays, we don't have these problems anymore. Spy- and Adware is now socially accepted and more popular than ever before. Naturally, the name has changed - the euphemism App just sounds cool and innocent.

Many (or even most) Apps for Android or IOS, the two major operating systems found on mobile phones and tablets, come with some important built-in consumer information right away. To retrieve these ads, an internet connection is needed because the advertising is tailored specifically for your needs (I know, it's great). Apart from this, an active internet connection introduces another great field of application. While Ads are transmitted to your device, your personal data may be sent from your device to trustworthy servers around the world. So it's a win-win situation for everybody - except for you.

The permission concepts of Android and IOS are, of course, completely useless because nobody cares anyway - "A flashlight app that requires access to Internet, Email accounts and GPS information - seems legit!". In addition, the modern operating systems are an ideal breeding ground for these privacy nightmare applications because of their standardized APIs. In contrast to a classical desktop computer system, it's extremely easy to collect data like calender events or Emails automatically because the APIs already include some ready-to-run methods for these purposes.

However, apart from avoiding this new technology, there isn't that much you can do about the aforementioned issues. Still, there are ways to figure out which data is sent from and to your device and it's even possible to filter this traffic. I'll describe on of these ways in the following. But be warned - there's no App for this and you will need a root shell ;)

/images/bridge.png

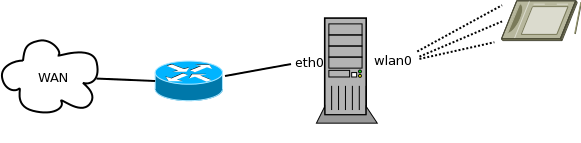
The image describes the basic setup. The PC acts as a Wi-Fi hotspot and forwards the traffic received from a tablet to the DSL router. To turn the PC into a hotspot, a Wi-Fi USB adapter that can act as a hotspot (iw list |grep AP) is required. Once the adapter is properly installed on your system, it's easy to create a hotspot with hostapd. The Arch Wiki contains some information about the configuration, but the default configuration file is quite self-explanatory and just needs a few adjustments. After the setup is done, brctl (on Debian contained in the package bridge-utils) is used to create a bridge that connects the wireless and the non-wireless network interfaces:

brctl addbr br0
brctl addif br0 eth0

Don't forget to add the correct bridge configuration line in your hostapd.conf:

bridge=br0

After the interfaces are brought up, you may start hostapd:

ip link set dev eth0 up
ip link set dev wlan0 up
ip link set dev br0 up
hostapd -B /etc/hostapd/hostapd.conf

If no errors occurred, you should be able to connect your wireless device to the newly created hotspot. As all traffic now flows through the PC system, we're able to record and inspect the network packets. tcpdump is the tool of choice for this task:

tcpdump -ni br0 -w tablet.pcap

The command collects all packets passing the bridge interface and writes them to a file tablet.pcap. No need to mention that the command must be run with root privileges. Once enough packets are collected, the PCAP file can be inspected with Wireshark. Hence we may, for example, check if the login data for our favorite shopping app is sent via a SSL secured connection or as plain text. As a thorough explanation of Wireshark's (and tcpdump's) capabilities could easily fill an entire book, I recommend you take a look at the documentation if you're interested in topics like filter expressions. However, basic knowledge of the TCP/IP protocol suite is mandatory for this.

I've mentioned earlier, that the setup not only allows us to capture all network traffic, but also enables us to filter (and even modify) the traffic. A few basic firewall rules are enough to stop all communication between the tablet and a specific IP/IP range:

iptables -A FORWARD --dest 192.168.1.0/24 -j DROP
iptables -A FORWARD --src 192.168.1.0/24 -j DROP

In the example, I've used a locally assigned IP address range - in a real world example you would most likely pick a non-private IP. Filtering by IP addresses however is not always a satisfying solution. Sometimes the packet payload is way more important than the destination or source information. To filter out all packets containing a specific string like "adserver", iptables' string matching extension is very useful:

iptables -A FORWARD -m string --string "adserver" --algo=kmp -j DROP

For this deep packet inspection, better tools might exist, but I'm not familiar with these (and my iptables skills have also become quite rusty).

All in all, a Linux driven hotspot opens up completely new possibilities when compared to a standard Access Point. Still, inspecting the traffic and creating proper firewall rules is a very cumbersome procedure.

Custom Git Prompt

From all the available Revision Control Systems I know, Git is my personal favorite. I use it for all my revision control needs at work and at home. As a consequence, I got quite a few git repositories residing in my home directory. To keep track of all these repositories, I modified my bash prompt in a way that it displays the most important git infos in the current directory (of course only if the directory is a git repo). My solution basically consists of two parts. First, I wrote a simple Perl script, that summarizes and colors the output of git status -s. Second, I created a bash script that is sourced at the end of the ~/.bashrc. This bash script overwrites the standard cd command and checks whether the new directory is a git repository. If the check doesn't fail, the output of the Perl script is integrated in the prompt.

In a first version, the bash prompt was completely refreshed after every command executed in the shell. For very large git repositories, however, this led to a noticeable lag after every command. So, I decided to rerun the git status script only if the last command executed in the shell was likely to modify the status of the git repo. My list of commands, that makes no claim to be complete, includes vim, cp, mv, and, of course, git. To manually rerun the status script, and, thus, update the prompt, I included the command g, that actually only triggers the git status script. As a drawback of this solution, changes made in the same git repo are not visible across multiple concurrent shell sessions. For my needs, however, it works well enough. See the following screenshot for a short demonstration:

/images/gitstatus.png

Please note that my prompt spans across two lines by default (over three when inside a git directory).

You can download the two scripts here. Move gitstatus into ~/bin/ and make it executable. Drop gitstatus.sh in your home directory as .gitstatus and add the following line to your .bashrc

. ~/.gitstatus

You may of course modify the GITPREFIX and GITSUFFIX variables in gitstatus.sh to fit your needs.

Find files in APT packages

On a Debian based Linux distribution like Crunchbang, it's quite easy to determine which package a specific file on the system belongs to. Issuing dpkg-query -S /usr/lib32/gconv/UNICODE.so on my desktop system tells me, that the file belongs to the libc6-i386 package - the 32 bit shared libraries for AMD64.

Sometimes, however, it comes handy to know what package a file not present on the filesystem belongs to. One prominent example is the tunctl program, that allows the creation of TUN/TAP interfaces on Linux. A search for tunctl via aptitude search tunctl doesn't yield any results. That's where apt-file comes into play. After installing it via aptitude install apt-file and updating the index with apt-file update, we can start a more advanced search. Using apt-file find tunctl, we get the info that the file /usr/sbin/tunctl is included in the uml-utilities package. To allow more sophisticated searches, apt-file offers various advanced options, e.g., for case insensitive searches based on regular expressions.

Gnuplot

Some years ago, when I had to create plots from measurement data for a student research project I first started using Gnuplot. Although several powerful alternatives exist, I never felt the need to switch away from Gnuplot and I'm still using it for all my plotting tasks. In almost all cases, these tasks consist of visualizing data that was acquired with the help of other tools, such as Iperf. Sometimes this data is not suitable to be feed directly into Gnuplot, but requires some preprocessing first. So my usual approach was to write a Bash or Perl script to preprocess and sanitize the collected data and then dynamically generate a Gnuplot script for this specific data set. Depending on data, however, this felt like a cumbersome and suboptimal approach. The two scripts res.pl and wrapper.sh illustrate this point. The Perl script is called by the bash script and transforms the input data into a whitespace seperated data set. The bash script then extracts several additional information, e.g. the axis labels. Then, a Gnuplot script is generated and executed to finally create the plot. Although this works, a more elegant way would have been the utilization of a gnuplot library, such as Chart::Graph::Gnuplot. I've written the small demo script frequency.pl to illustrate the usage of the aforementioned library. The script counts the character frequency of an input file and creates a plot like the following from the collected data.

/images/frequency.png

All in all, the usage of this library feels much more comfortable, especially when dealing with poorly formatted input data that requires a great amount of preprocessing. Of course, Gnuplot bindings for languages other than Perl do exist as well.

Sudoku

Solving sudoku puzzles usually requires nothing more than a pen and some time. Solving 50 sudoku puzzles, however, requires a huge amount of time. 50 sudoku puzzles...? Yep, to get the solution for Problem 96 on ProjectEuler, 50 sudokus need to be solved first. I've solved my first 49 problems on ProjectEuler a few years ago and recently rediscovered the website. So I started with the sudoku problem and got the solution quite fast by using a simple brute force algorithm. I'm not going to post the solution for the problem, but just the C++ code for my sudoku solver. After compiling the program with g++ -std=c++11 -O6 -o sudokusolver sudokusolver.cpp, sudokus given in an input file are solved with a simple recursion based algorithm. An example is given below:

Trying to solve:
---------
003020600
900305001
001806400
008102900
700000008
006708200
002609500
800203009
005010300
---------
    |
    V
---------
483921657
967345821
251876493
548132976
729564138
136798245
372689514
814253769
695417382
---------

The sudokus in the input file must consist of 9 consecutive lines containing the initial values inside the sudoku. Blank fields are represented by zero. Multiple sudokus have to be separated by at least one dash in a single line.

Encoding Hell

Some years ago, when I first started using Linux, my system's locale was set to ISO8859-15. Over the years I switched to UTF-8 of course. Though I now tend to use proper filenames for all my files, I come across witnesses of the old days, when I was littering my filenames with crappy [1], or even crappier[2] characters, once in a while. In my defence I have to say, that lots of these files carry names I didn't choose by myself, because they were auto-generated by CD rippers or other software. Some files even date back to the time when I was exclusively using Windows and didn't care about filenames or encodings at all.

Using the command from my posting about rename can usually fix all these filenames, but this might not always be what you want - a folder named glückliche_kühe is renamed to gl_ckliche_k_he - not a perfect solution. What you might really want is to convert the filename from one encoding to another, and good for you, somebody already did all the work and created a nifty little program called convmv, which supports 124 different encodings. The syntax is quiet easy:

convmv -f iso8859-15 -t utf-8 *

This would show which filenames in the current directory would have been converted from ISO8859-15 to UTF-8 if you'd explicitly added the - -notest option to the command-line.

Thats the easy way, but let's assume you want to work with the glückliche_kühe folder without re-encoding the filename. Be aware of the fact, that some graphical file mangers may not handle filenames with wrong encodings correctly. On my system, krusader couldn't open the ISO8859-15 encoded test folder, while gentoo (yes, this is indeed a file manger) only displayed a warning. Additionally, there are situations, where no graphical environment is available at all.

So, the far more interesting question is how to work with these files in a shell environment. The naive approach cd glückliche_kühe fails because the ISO8859-15 ü is different from the UTF-8 ü - our UTF-8 environment will correctly respond that there's no such folder. A simple ls will show a question mark for every crappier character in the filename and that's not exactly useful either, since we can't uniquely identify the names this way. How would you change into glückliche_kühe if there's also a folder called gl_ckliche_k_he? Typing cd gl?ckliche_k?he is ambiguous since the question mark is treated as a special character by the Bash and expands to match any character. Depending on the situation, this might or might not work as the Bash returns a list of all matching filenames for your input sequence gl?ckliche_k?he. One solution is to run ls with the -b option - this way, we instruct ls to print unprintable characters as octal escapes:

user@localhost /tmp/test $ ls -b
gl\374ckliche_k\374he

This gives us something to work with. echo can interpret these escape sequences and Bash's command substitution offers a way to use echo's output as a value.

user@localhost /tmp/test $ cd "$(echo -e "gl\0374ckliche_k\0374he")"
user@localhost /tmp/test/glückliche_kühe $ pwd
/tmp/test/glückliche_kühe

There are three things you should note here. First of all, in order to mark the escaped sequences as octal numbers, you need to add a leading zero in the way I did in this example. Secondly, the -e parameter is required to tell echo to interpret escaped sequences rather than printing the literal characters. The last thing is not exactly related to the encoding problem, but always worth mentioning: the quotes are supposed to be there for a reason!

So, now the encoding hell shouldn't look so scary anymore - at least not with respect to filenames. ;)

Oh, and by the way, if you just want to check if you got any wrongly encoded filenames, this one-liner could help:

find . -print0 | xargs -0 ls -db  | egrep "\\\[0-9\]{3}"

[1] every character c, that is not in [a-zA-Z0-9._-]+

[2] every character c, where utf8(c) != iso8859-15(c)

Rebuilding Debian packages

Most of the software installed via APT, Debian's package management system, runs perfectly fine without any reason to complain. In some rare cases however, you might find yourself unsatisfied with a package and have the itch to recompile it. For me, Debian's package for the Vim text editor is one of these cases - the package available in the repositories was compiled without support for the Perl interface. Of course, one could just visit vim.org, download the latest sources for Vim, check the build requirements and install the missing libraries manually, call ./configure with the correct parameters, compile the program and finally install it. Apart from being a quiet cumbersome procedure, APT would not include this version of Vim into its database. So, there has to be a better way to do this, and indeed, there is one.

First of all, two packages and their dependencies are required for the next steps - build-essential and devscripts. They should be available in the repositories and can be installed as usual:

su root -c "apt-get install build-essential devscripts"

Once this is done, we'll change to our developer directory and download the sources for Vim as well as the build dependencies.

mkdir -p ~/devel
cd ~/devel
apt-get source vim
apt-get build-dep vim

When this is finished, a new directory ~/devel/vim-*VERSION*/ should contain the sources for Vim as well as Debian specific patches/configurations. Now, one could do all kinds of changes tho Vim's source code, but we just want to to modify a configuration parameter. This is done by editing the debin/rules file, which contains the default configure flags for the package. The flags defined here are passed to the configure script during the build process. The Perl interface can be enabled by swapping a parameter from --disable-perlinterp to --enable-perlinterp. Thereafter, you just need to invoke the following command and wait until the compilation process is finished:

debuild -us -uc

If no errors occurred, you'll find several *.deb files inside your ~/devel directory. To install Vim, just pick vim-*VERSION*_*ARCH*.deb and install it via dpkg, e.g. on my box:

su root -c "dpkg -i vim_7.3.547-4_amd64.deb"

vim --version should now show +perl instead of -perl, and :perldo is finally available. ;)

Delete all files except one

A couple of days I was asked if knew an easy way to delete all but one files in a directory. If you didn't already guess it from this blog entry's title, there is a simple way - or to be more precise - there are several ways. The first one is quiet straightforward and uses the find command:

find . -not -name do_not_delete_me -delete

This works recursively and also preserves files named do_not_delete_me contained in sub-folders of the current directory:

user@host /tmp/test $ ls -R
.:
a  b  c  do_not_delete_me  foo

./a:
foo

./b:
bar  do_not_delete_me

./c:
baz
user@host /tmp/test $ find . -not -name do_not_delete_me -delete
find: cannot delete `./b': Directory not empty
user@host /tmp/test $ ls -R
.:
b  do_not_delete_me

./b:
do_not_delete_me

As you can see, find tries to delete the folder b but fails because the folder is not empty. If you don't care for files in sub-directories, it gets a bit more complicated with find:

find . -mindepth 1 -maxdepth 1 -not -name do_not_delete_me -exec rm -rf -- {} +

The -mindepth/-maxdepth parameters tell find to ignore sub-directories, because we're not interested in their contents. This should also save some execution time - especially if the directory hierarchy is really deep.

While this works well, Bash's pattern matching offers an easier solution for this:

rm -rf !(do_not_delete_me)

As the manpage explains, the text enclosed by brackets is considered to be a pattern list, i.e. constructs like !(*.jpg|*.png) are perfectly valid. If you don't care for files in sub-directories, this might be the preferred way - it's shorter and maybe even faster than the solutions using find.

No matter which solution you choose, refrain from error-prone constructs like rm -rf `ls | grep -v do_not_delete_me`.